There hasn't been a significant to the Oracle Analytics Cloud (OAC) since March. In May, OAC received a small update in the 105.2.3 release in which pause and resume services were added, allowing the services you deploy in the Oracle Cloud Infrastructure to pause, preventing users from accessing them.
In release 105.3, we see new features added to Service Management, Data Visualization, Pixel-Perfect Reporting, as well as a new feature for connecting to on-prem data sources.
In this blog post, we'll go over these new features, steps for how you can use the new features, as well as a list of defects fixed in this release.

Service Management
More Options to Scale Services
You can scale services within the OCPU range available to your service. Users don't experience any downtime when you scale a service up or down; your service stays up and running.
Scale options aren't available if you have a fixed Oracle Analytics Cloud Subscription. If you want to scale services created with Oracle Analytics Cloud Subscription, you must create a new service instance with the OCPUs (or users) that you want and migrate your existing content to the new service.
Data Visualization and Business Intelligence Services
You can either scale between 2 and 8 OCPUs or between 10 and 12 OCPUs. If you want to scale across these ranges (for example, scale up from 8 to 12 OCPUs or scale down from 12 to 6 OCPUs), you must create a service instance with the OCPUs that you want and migrate your content to the new service.
Essbase Services
You can either scale between 6 and 8 OCPUs or between 10 and 16 OCPUs. If you want to scale across these ranges (for example, scale up from 8 to 16 OCPUs or scale down from 12 to 8 OCPUs), you must create a service instance with the OCPUs that you want and migrate your content to the new service.
Steps to Scale Up or Down
1. In My Services, open the dashboard.
2. Navigate to the Analytics tile, click Action Menu, and then select Open Service Console.
3. Note how many OCPUs your service currently uses.
The current OCPU value is displayed on the Instances page, next to the Created On date for your service.
The Scale Instance menu displays if scale options are available for your environment.
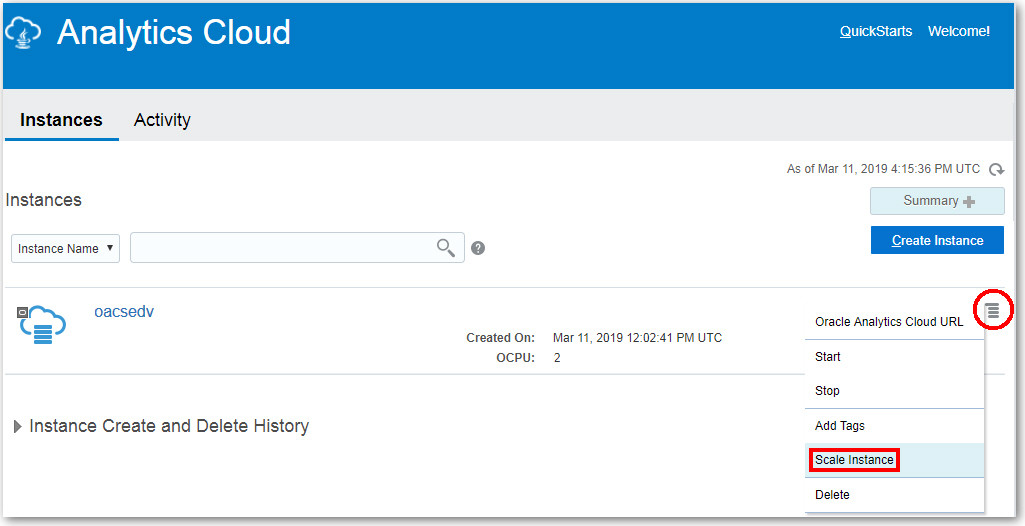
You can scale services listed on the Analytics Cloud Instances page.
Services that you created with early versions of Oracle Analytics Cloud (18.2.1.xxxx or earlier) don't appear in the Instances list; you manage these services through Oracle Cloud Stack.5
5. To scale up the service:
a. For Scale Up or Down, select Increase.The Increase option isn’t displayed if your service currently uses the maximum number of OCPUs available for your service (see table).
b. For Increase or Decrease OCPUs By, select how many OCPUs you want to add.
The values available to you depend on how many OCPUs your service currently uses. Remember, you can add OCPUs only within the OCPU range of your service.
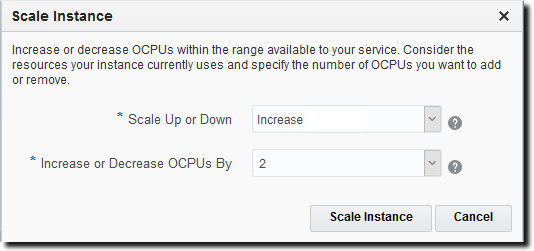
c. Click Scale Instance to confirm.
The scale-up operation takes a few minutes to complete. While in progress, the status of the service changes to Service Maintenance.
The Decrease option isn’t displayed if your service currently uses the minimum number of OCPUs available.
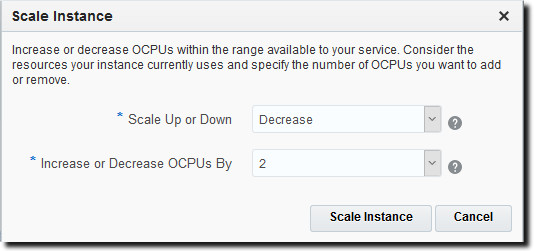
The scale-down operation takes a few minutes to complete. While in progress, the status of the service changes to Service Maintenance.
You can't scale up or down while your service is being backed up, restored, or undergoing similar administrative operations. If you see the message System is not in a READY state. Current state is CONFIGURING, wait a few minutes for the current operation to complete and try again.
For more information on scaling services, as well as OCPU ranges, see the OAC document.
Redesigned Console
Redesigned System Settings page
This is a redesigned page that makes it easier for you to find and update advanced service-level settings.
Performance and Compatibility Options
You use these options to configure performance and compatibility settings between Oracle BI Enterprise Edition and Oracle Analytics Cloud. For example, you can set the maximum temporary file size.
Analysis, Dashboard, and Pixel-Perfect Report Options
You use these options to set defaults and customizations for dashboards, analyses, and reports. For example, you can configure the analysis editor to open by default to the Criteria tab or the Results tab.
Usage Tracking Options
You use these options to specify how you want to monitor system usage. For example, you can set the number of rows that you want stored in the usage tracking tables.
Prompt Options
You use these options to configure prompt behavior. For example, you can enable search results to automatically display as highlighted when users enter search parameters, without the need to click Search.
Format Options
You use these options to configure default currency and time zone settings.
View Options
You use these options to configure default search and viewing settings for users.
Connection Options
You use these options to configure connection defaults. For example, you can specify how often to synchronize the database connections defined in Console.
Security Options
Use Security options to control how users can perform specific actions.
Set Advanced Options for the Service
Use Console to set advanced options for Oracle Analytics Cloud.
For more about setting up advanced configuration, see the OAC document.
Data Visualization
Visualization Types
You can now create Language Narrative visualizations. The Language Narrative visualization provides insights into your company's data. These insights can be in the form of breakdown or trend.
About the Language Narrative Visualization
The Language Narrative visualization creates natural language descriptions of the attributes and measures in your data set. The descriptions provide insights into your company's data in the form of breakdown or trend.
For example, if you create a project with Sample Sales and you drag the T00 Calendar Date time dimension and the 1-Revenue measure to the canvas and then select the Language Narrative visualization.
The natural language description capabilities are provided by the integration of Oracle Analytics Cloud with its artificial intelligence technology partner Yseop.
Supported Data Element Combinations
You can use the Language Narrative visualization with the following combinations:
- Two attributes and one measure.
- One attribute and two measures.
The attributes that you select can be regular columns or time dimensions. And columns may contain long character names and special characters.
Create a Language Narrative Visualization
Use the Language Narrative visualization type for descriptions of the attributes and measures in your data set. The descriptions provide insights into your company's data in the form of breakdown or trend.
Tooltips Improvement
Use the Tooltips field to adjust the content in a visualization's tooltips or to turn off a visualization's tooltips.
Modify a Visualization's Tooltips
By default when you hover over a data point in a visualization, a tooltip displays and provides specific information about the data point. You can choose to see all tooltips or only the measures included in the Tooltip section of the Grammar Panel.
- You can drag and drop only measure columns to the Tooltip section in the Grammar Panel.
- The Tooltip section in the Grammar Panel doesn't display for all visualization types.
Refresh Embedded Data
You can now configure the refresh of data in embedded HTML pages.
When you embed content in a project, that project likely accesses an underlying data set whose data may change so the project needs refreshing. You can configure the refresh of data embedded in an HTML page in a Data Visualization project.
Every Data Visualization embedded project (defined with the <oracle-dv> element) provides a refreshData method that you can invoke when the data shown in the embedded project should be refreshed.
The code to refresh data for a single project embedded in an HTML page looks like this:
<oracle-dv id="project1" project-path="">
</oracle-dv>

<script>
   function refreshProject() {
      $('#project1')
  [0].refreshData();
}
</script>
The code to refresh data for multiple projects embedded in an HTML page looks like this:
<script>
   function refreshProject()
   {
      $('oracle-dv').each(function() {
         this.refreshData();
         });
}
</script>
Any data changes that you refresh in a Data Visualization project are reflected in the embedded HTML page when you invoke the method to refresh the data.
Select Alias Table
You can now select an alias table when creating or updating Essbase data sets. After you create Essbase connections, you can use those connections to create data sets.
Configure Currency Symbols
You can now dynamically populate a currency symbol in visualizations based on the configured currency.
- Create or open the project.
- In the Properties panel for a selected measure, click the Values tab, click Number Format, and select Currency.
- In the Currency field, click the currently displayed value and select Custom.
- In the Custom field, add the column that determines the currency code.
- Click Save.
Pixel-Perfect Reporting
View Audit Data
You can enable or disable audit of reports and catalog objects. You can download and use the sample reports for viewing the audited information.
The sample reports use the JNDI connection to fetch data from the data source for auditing. The report layout and data model are pre-designed in the sample reports. You can customize the report layout, but don't change the data model in the sample reports. The sample reports are configured to run as a scheduled job because the size of auditing data can be large. If you want to view an audit report online, select the Run Report Online property and make sure you don't select the Auto Run property of the report.
To view audit data:
- Download the sample audit reports from the BI Publisher home page in Oracle Technology Network.
- Upload the sample audit reports to a shared folder in the catalog.
- Schedule the sample audit reports you want to view.
- After the scheduled job completes, view the report in the Report Job History page.
Scale Up and Down
As Cloud Account Administrator, you can create and set up services in Oracle Analytics Cloud for your organization. To learn how to create a service and the workflow for creating a service, check out the OAC document.
Connecting to On-Premises Data Sources
You can now connect more easily to on-premises data sources using Data Gateway. Install Data Gateway in your on-premises environment on Linux, MacOS, or Microsoft Windows to connect to on-premises data sources.
Introduction of Data Gateway and Deprecation of Remote Data Connector
OAC version 105.3 introduces the Data Gateway utility. This utility replaces the Remote Data Connector of earlier releases. Although you can continue to use Remote Data Connector, it's been deprecated as of OAC 105.3 and will be removed in future releases no sooner than six months from the release date of 105.3. Oracle recommends adopting Data Gateway within six months of the release date of 105.3 to avoid loss of functionality.
To learn more about what to do before installing Data Gateway and the workflow for installing the utility, check the OAC document.
Subscribe to our blog and check back for more information on Data Gateway.
OAC Classic/OAC Essbase Defects Fixed
| 29460765 | - OAC: ESSBASE PATCH DOES NOT INSTALL AS BACKUP FAILS |
| 29753643 |
- PORT TO 12.2.1.1.115PSE: 29668142 - ESSBASE STOPPED RETURNING MEMBER_ALIAS PROPERTY |
| 29474677 |
- LAUNCHING CALCULATION TAKES SEVERAL MINUTES TO START FOR NON-ADMIN MSAD USERS |
| 29514752 |
- BACKPORT TO 12.2.1.1.115PSE: 28929973 - OAC APPLICATION CRASHING VERY FREQUENTLY |
OAC/OAC Classic Defects Fixed
29678776 - DATA ACTIONS PASS PARAMETERS TO TARGET CANVASES EVEN WHEN SET TO NONE
29525058 - PSR:PERF:OAC BISEARCH - RESTCLIENTS CAUSING OOM
29582958 - OAC:C- EXPORT AND OTHER REPORT LINKS NOT VISIBLE FROM ACTION LINK
29385806 - NOT OPERATION DOESN'T WORK AGAINST PBCS DATA SOURCE
28951555 - OAC-C : PROMPT WITH VARCHAR TYPE DESCRIPTOR ID LOSES BASE DISPLAY COLUMN NAME
29632686 - OAC(CUSTOMER MANAGED) :COUNT DISTINCT VALUE RETURNED WITH COUNT FUNCTION ON MY CALCULATION OF DV
29558291 - OAC (CUSTOMER MANAGED) : FREQUENT ORA-03135: CONNECTION LOST ERROR IN DASHBOARD
28851424 - FAILED TO DELETE DATA SET
29677620 - CUSTOM VOS FAIL TO REPLICATE WITH DATABASE NAME IS EMPTY, VO MAY BE MISSING ERROR
29470453 - OAC-C:REPORT FAILED WITH [NQSERROR: 46036] INTERNAL ASSERTION: CONDITION MEMORYALLOCATEDINKB_ > TEMPOLDSIZE
29547188 - OAC -C BICS MIGRATION JAR FILE IMPORT FAILING ON THE CATALOG
29506310 - PASS VALUE DOES NOT WORK FOR CANVAS LINK DATA ACTION NAVIGATE TO EXTERNAL PROJECT
Want to learn more about OAC and its user experience?
Take an in-depth tour of the platform...