All of us that have been using Hyperion products for years know that version 11.1.2.3 was the last edition of the “FDM Classic” or Financial Data Quality Manager (FDM), formerly Upstream Weblink. The result of a merger of FDM with Enterprise Resource Planning Integrator (ERPi) (which uses the Oracle Data Integrator engine), is what we call Financial Data Quality Management, Enterprise Edition (FDMEE).
FDMEE now has a full Oracle Data Integrator (ODI) backend installed by default. If you enter through “Workspace” you will see that not much has changed with the user interface. However, if you are an ODI or Oracle Data Integration developer, the screens that you are used to seeing in ODI Studio are not available.
ODI has expanded logging and allows for more granularity than what is available within the FDMEE user interface alone. To use this granularity, you have to install the ODI Studio client, which can be installed on the server, and even most laptops. ODI Studio is especially helpful when things don’t go as expected since it allows better insight into the processes and how they function (or don’t function).
Oracle installs most ODI things now, that in the past were not a simple install such as the ODI agent and the necessary Windows services, within the Hyperion configuration process. One thing that they still do not install by default is ODI Studio. In this step-by-step FDMEE tutorial, we'll show you how to install ODI Studio.
ODI Studio can be found by going to eDelivery and, after some searching for Hyperion products, you will find the option to download Oracle Data Integrator Studio (11.1.1.7.0):
![]()
Note: Now that you know that the item number ‘V37940-01’ (1.5GB) is the ODI Studio that you require, you can search for that number to minimize your search efforts. You might be able to find the full version of ODI 11.1.1.7 (V37390-01_1of2.zip and V37390-01_2of2.zip and 2.8 GB), but we are not using those files here.
You'll notice that this is not the full version of ODI Studio. If you try to install anything other than the Studio you will get errors. In fact, you will get errors when you use this install, even if you only install the Studio. It appears that, with this download, Oracle has left out a few CAB files.
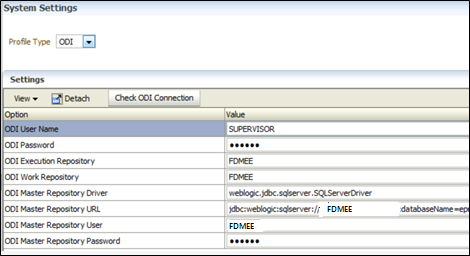
The good news is that the CAB files that they left in allow for the install of the Studio and connects nicely to the FDMEE backend. You will need to login to Workspace and open FDMEE to get the configuration information used to login to ODI.
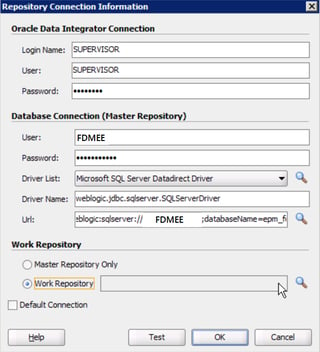
You will also have to know that the default password for ‘SUPERVISOR’ is ‘SUNOPSIS’, a reference to the company that Oracle acquired. You also need the password for the relational that is the backend of FDMEE, which you may have to get from your DBA.
To get the configuration information, in FDMEE click the ‘Setup’ tab, select “System Settings” in the “Configure” section under “Tasks.” You might even want to select the ‘ODI’ option from the ‘Profile Type’ dropdown menu.

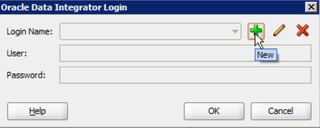
This information is all that you will need to configure your newly installed ODI Studio. Once you start your ODI Studio console, you will need to click on the ‘Connect To Repository’ button. This will bring up our old friend − the ODI login screen:

Plug in the information that you obtained from the FDMEE screen:

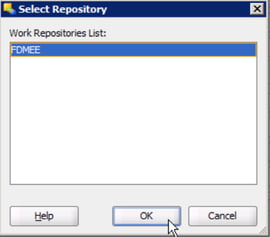
You should be able to click on the button for the “Work Repository” search and select “FDMEE” at this time. This also tests your relational setup as well, if you get this option:

There you have it: the ODI Studio in all of its glory. The agent is already running and you can use the logging of the Session List.


